Automating Release Notes Like a Pro: Deep Dive into Smart Release Notes Action
Discover how to automatically generate clean, categorized release notes directly from your GitHub PRs and commits using Smart Release Notes Action. Learn setup, configuration, and best practices for seamless release automation.
I remember the days before automated release notes. We'd manually copy-paste PR titles into a word document, spend hours categorizing changes, and inevitably forget something important. That's the problem Smart Release Notes Action solves – and it does it brilliantly.
If you've been manually crafting release notes or using basic tools that don't understand your workflow, this comprehensive guide will show you how Smart Release Notes Action can transform your release process entirely. By the end, you'll have a fully automated system that generates professional release notes in seconds.
What Makes Release Notes Matter?
Before diving into the technical side, let's be honest about why release notes matter. They're often the first thing users read when a new version drops. A well-written changelog tells your users exactly what's changed, what bugs got fixed, and what new capabilities they can use. It builds confidence and reduces support tickets because people understand what's actually different.
The traditional approach of manually writing these is error-prone and time-consuming. That's where automation comes in.
Introducing Smart Release Notes Action
Smart Release Notes Action is a GitHub Action that sits in your CI/CD pipeline and automatically generates professional release notes from your merged pull requests and commits. No more manual work. No more forgotten changes. Just clean, categorized release notes that actually reflect what happened in your codebase.
Here's what it does in plain terms:
- Watches your tags: When you push a new version tag to GitHub, it springs into action
- Collects your changes: It gathers all PRs and commits between the old version and new version
- Categorizes automatically: Using labels you define, it organizes changes into meaningful sections
- Generates markdown: It outputs beautifully formatted release notes ready to publish
The beauty lies in the flexibility. You get three different modes depending on how your team works, and unlimited customization for how changes are organized.
The Three Operating Modes
Understanding these modes is crucial because they directly affect how your release notes look. Pick the wrong one and you'll be frustrated; pick the right one and everything flows naturally.
PR Mode: The Structured Approach
PR Mode exclusively uses merged pull requests to build your changelog. This is ideal if your team treats GitHub PRs as the single source of truth.
PR Mode works best for teams that have strong discipline around PR labels. Every PR must be labeled correctly before merging, otherwise it ends up under "Miscellaneous."
When you use this mode, each merged PR becomes a line item in your release notes. The PR's labels determine which category it belongs to. If a PR has the feature label, it goes under "New Features." If it has bug, it lands under "Bug Fixes."
Here's when to choose PR Mode:
- Your team creates PRs for every single change
- You've established a consistent labeling system
- You want strict categorization with no room for error
- You rarely commit directly to main
The workflow is straightforward:
- name: Generate Release Notes
  id: notes
  uses: nayandas69/smart-release-notes-action@v1
  with:
    token: ${{ secrets.GITHUB_TOKEN }}
    mode: PR
COMMIT Mode: The Flexible Approach
COMMIT Mode looks directly at your git commit messages instead of PR metadata. This works if your team follows a commit convention like Conventional Commits.
If you're already using commit conventions like feat:, fix:, docs: prefixes, COMMIT Mode feels natural. The action parses these patterns automatically.
This mode is perfect for projects where developers work directly on branches or where your commit messages are already incredibly descriptive. The action reads commit message prefixes to determine categories.
Choose COMMIT Mode when:
- Your team commits frequently without creating PRs
- You follow a commit message convention already
- You have detailed commit messages that tell the story
- You want maximum flexibility without label discipline
Here's the basic setup:
- name: Generate Release Notes
  id: notes
  uses: nayandas69/smart-release-notes-action@v1
  with:
    token: ${{ secrets.GITHUB_TOKEN }}
    mode: COMMIT
HYBRID Mode: The Best of Both Worlds
HYBRID Mode is the default, and honestly, it's the sweet spot for most teams. It combines both PRs and commits into one comprehensive changelog.
Think of it this way: you get PRs when they exist (structured, labeled changes) and fall back to commits when needed (catching those direct pushes). Your release notes become complete without requiring perfect adherence to one workflow.
HYBRID Mode is the recommended default. Unless you have a specific reason to limit yourself to just PRs or just commits, stick with HYBRID. Your team's workflows will inevitably be messy – let the tool handle that mess elegantly.
Use HYBRID Mode unless you have a strong reason not to:
- Your team uses both PRs and direct commits
- You want the most comprehensive changelog possible
- You're not sure which mode fits your workflow yet
- You value flexibility over strict categorization
Getting Started: The 5-Minute Setup
Setting up Smart Release Notes Action is genuinely quick. Most teams get this working in one coffee break.
Step 1: Create Your Workflow File
Create a new file called .github/workflows/release-notes.yml in your repository:
name: Generate Release Notes
on:
  push:
    tags:
      - "v*"

jobs:
  release:
    runs-on: ubuntu-latest
    permissions:
      contents: write
    steps:
      - uses: actions/checkout@v4
        with:
          fetch-depth: 0

      - name: Generate Release Notes
        id: notes
        uses: nayandas69/smart-release-notes-action@v1
        with:
          token: ${{ secrets.GITHUB_TOKEN }}

      - name: Create GitHub Release
        uses: softprops/action-gh-release@v2
        with:
          body: ${{ steps.notes.outputs.changelog }}
This workflow triggers whenever you push a tag matching the pattern v* (like v1.0.0, v2.1.3, etc.). The action generates notes, and they're automatically attached to your GitHub Release.
Pay attention to the fetch-depth: 0 setting in the checkout action. Without this, Git won't fetch the full history and the action won't be able to find your tags correctly. It's a small detail with big consequences.
Step 2: Make Sure You Have Git Tags
The action needs at least two tags to generate a changelog (the "from" tag and "to" tag). Create your first tags if you haven't already:
git tag v0.1.0
git push origin v0.1.0

git tag v1.0.0
git push origin v1.0.0
Step 3: Test It Out
Create a new tag and push it:
git tag v1.0.1
git push origin v1.0.1
Watch your Actions tab. The workflow runs, the action generates release notes, and if everything's configured right, you'll see a new Release on your repository page.
That's it. You're done. Seriously.
Customization: Making It Yours
Out of the box, Smart Release Notes Action uses sensible defaults. But most teams want more control over how changes are categorized and displayed.
Custom Categories Configuration
Create a file called .github/release-config.json in your repository. This is where you define how PRs get organized into sections.
Here's a practical example for a web application:
{
  "categories": [
    {
      "title": "✨ What's New",
      "labels": ["feature", "enhancement", "new"]
    },
    {
      "title": "🐛 Bug Fixes",
      "labels": ["bug", "fix", "regression", "hotfix"]
    },
    {
      "title": "🎨 UI & Design",
      "labels": ["ui", "ux", "design", "styling"]
    },
    {
      "title": "⚡ Performance",
      "labels": ["performance", "optimization", "speed"]
    },
    {
      "title": "🔒 Security",
      "labels": ["security", "security-fix", "vulnerability"]
    },
    {
      "title": "📚 Documentation",
      "labels": ["documentation", "docs", "doc-update"]
    },
    {
      "title": "🔧 Under the Hood",
      "labels": ["refactor", "chore", "ci", "build", "deps"]
    }
  ],
  "uncategorizedTitle": "🎉 Other Changes"
}
The structure is intuitive: each category has a title and an array of labels. When the action encounters a PR with any of those labels, it goes into that category.
Using Your Custom Config
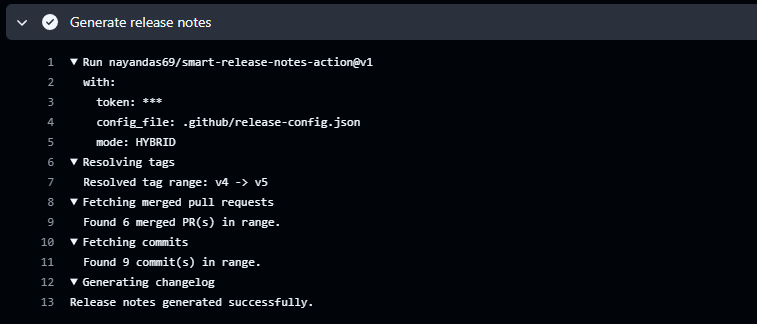
Update your workflow to reference the config file:
- name: Generate Release Notes
  id: notes
  uses: nayandas69/smart-release-notes-action@v1
  with:
    token: ${{ secrets.GITHUB_TOKEN }}
    config_file: .github/release-config.json
    mode: HYBRID
Now when your action runs, it uses your custom categories instead of the defaults.
How Category Matching Works
Here's the algorithm that makes this all work: The action looks at the first category in your config. If the PR has any of the labels in that category, the PR gets placed there. Period. It stops looking.
This matters because if you have overlapping labels across categories, order determines everything.
Don't put the same label in multiple categories. The action matches the first category it finds and stops. So if you have both feature and enhancement covering similar changes, put them in the same category for consistency.
For example, if a PR has both the feature and documentation labels, and feature appears first in your config, that PR lands in the "What's New" section. The documentation label is ignored.
Real-World Configuration Examples
Different projects have different needs. Here are three proven configurations you can adapt to your situation.
For a Backend API Service
API changes deserve special prominence because they affect integrations:
{
  "categories": [
    {
      "title": "🚨 API Changes",
      "labels": ["api", "endpoint", "breaking", "schema", "deprecation"]
    },
    {
      "title": "✨ Features",
      "labels": ["feature", "enhancement"]
    },
    {
      "title": "🐛 Bug Fixes",
      "labels": ["bug", "fix", "regression"]
    },
    {
      "title": "⚙️ Database",
      "labels": ["database", "migration", "db"]
    },
    {
      "title": "🚀 Performance",
      "labels": ["performance", "optimization", "perf"]
    },
    {
      "title": "🔒 Security",
      "labels": ["security", "vulnerability"]
    },
    {
      "title": "📦 Infrastructure",
      "labels": ["infrastructure", "deployment", "devops"]
    },
    {
      "title": "🔗 Dependencies",
      "labels": ["dependencies", "deps", "packages"]
    }
  ],
  "uncategorizedTitle": "Maintenance"
}
For an npm Package/Library
Library maintainers need to signal breaking changes clearly:
{
  "categories": [
    {
      "title": "💥 Breaking Changes",
      "labels": ["breaking", "breaking-change", "major"]
    },
    {
      "title": "✨ New Features",
      "labels": ["feature", "enhancement", "new"]
    },
    {
      "title": "🐛 Bug Fixes",
      "labels": ["bug", "bugfix", "fix", "hotfix"]
    },
    {
      "title": "⚡ Performance",
      "labels": ["performance", "perf", "optimization"]
    },
    {
      "title": "📖 Documentation",
      "labels": ["docs", "documentation", "examples"]
    },
    {
      "title": "🔄 Internal",
      "labels": ["chore", "refactor", "tech-debt", "ci", "build"]
    }
  ],
  "uncategorizedTitle": "Other"
}
For a SaaS Product
Product teams care about user-facing features and improvements:
{
  "categories": [
    {
      "title": "🌟 New Features",
      "labels": ["feature", "product", "new"]
    },
    {
      "title": "🎯 Improvements",
      "labels": ["enhancement", "improvement", "ux"]
    },
    {
      "title": "🐛 Bug Fixes",
      "labels": ["bug", "fix", "issue", "regression"]
    },
    {
      "title": "🎨 Design & UI",
      "labels": ["design", "ui", "styling", "ux-improvement"]
    },
    {
      "title": "⚡ Performance",
      "labels": ["performance", "speed", "optimization"]
    },
    {
      "title": "🔐 Security & Privacy",
      "labels": ["security", "privacy", "compliance"]
    },
    {
      "title": "📝 Docs & Guides",
      "labels": ["documentation", "guide", "tutorial"]
    }
  ],
  "uncategorizedTitle": "Other Updates"
}
Pick the one closest to your situation and customize from there. You're not locked in – change it whenever your needs evolve.
Practical Workflows and Integration Patterns
Smart Release Notes Action doesn't work in isolation. It's part of a bigger release workflow. Here's how to integrate it with other tools.
Creating a Complete Release Workflow
This workflow not only generates release notes but also creates a GitHub Release with attachments:
name: Publish Release
on:
  push:
    tags:
      - "v*"

jobs:
  release:
    runs-on: ubuntu-latest
    permissions:
      contents: write
    steps:
      - uses: actions/checkout@v4
        with:
          fetch-depth: 0

      - name: Generate Release Notes
        id: notes
        uses: nayandas69/smart-release-notes-action@v1
        with:
          token: ${{ secrets.GITHUB_TOKEN }}
          config_file: .github/release-config.json

      - name: Create GitHub Release
        uses: softprops/action-gh-release@v2
        with:
          name: "Release ${{ steps.notes.outputs.to_tag }}"
          body: ${{ steps.notes.outputs.changelog }}
          draft: false
          prerelease: false
This creates a formal release with your generated notes as the body.
Posting to Slack
Want your team to see new releases in Slack? Pipe the output directly to a Slack notification:
- name: Generate Release Notes
  id: notes
  uses: nayandas69/smart-release-notes-action@v1
  with:
    token: ${{ secrets.GITHUB_TOKEN }}
    config_file: .github/release-config.json

- name: Notify Slack
  uses: slackapi/slack-github-action@v1
  with:
    payload: |
      {
        "text": "🚀 New Release: ${{ steps.notes.outputs.to_tag }}",
        "blocks": [
          {
            "type": "section",
            "text": {
              "type": "mrkdwn",
              "text": "*What's New:*\n${{ steps.notes.outputs.changelog }}"
            }
          }
        ]
      }
  env:
    SLACK_WEBHOOK_URL: ${{ secrets.SLACK_WEBHOOK }}
Your team gets notified instantly. No more digging through GitHub to find releases.
Manual Tag Range Specification
Sometimes you need to generate release notes for a specific range that doesn't follow the automatic detection. This is useful for generating notes for patch releases:
- name: Generate Release Notes
  id: notes
  uses: nayandas69/smart-release-notes-action@v1
  with:
    token: ${{ secrets.GITHUB_TOKEN }}
    from_tag: v1.5.0
    to_tag: v1.5.3
    config_file: .github/release-config.json
This is particularly handy when you're backporting fixes to an older release branch.
Best Practices That Actually Work
I've seen teams implement Smart Release Notes Action in many different ways. The ones that get the most value follow these patterns:
1. Enforce Label Discipline
Labels are the backbone of this whole system. Without consistent labeling, your release notes become a mess.
Implement a branch protection rule that requires at least one label on every PR before it can be merged. Most teams do this through their GitHub settings:
- Go to repository Settings → Branches
- Under branch protection rules, add a requirement for label checks
- Require at least one label from your defined categories
2. Use Emoji in Categories (But Keep It Tasteful)
Emoji breaks up walls of text and makes scanning release notes faster. Users quickly learn that 🚀 means new features and 🐛 means bugs. Just don't overdo it – one emoji per category is plenty.
3. Create a Release Checklist
Before pushing that version tag, make sure everything is ready:
- All PRs since last release are merged
- Each PR has at least one category label
- You've updated version numbers in package.json / version file
- Major changes are documented in a migration guide if needed
- Tag name follows your versioning scheme (v1.2.3)
4. Document Your Category Schema
Keep a document (or a README in your .github/ folder) explaining what each label means. This helps new team members label PRs correctly without guessing.
Example:
# PR Labeling Guide

- **feature**: New functionality that adds value for users
- **bug**: Fixes for broken or incorrect behavior
- **enhancement**: Improvements to existing features
- **performance**: Changes that make things faster
- **security**: Security fixes or vulnerability patches
- **docs**: Documentation updates
- **chore**: Internal changes with no user impact
5. Test Your Config Before Going Live
When you update your release config, test it with a dry run using manual tag specification:
# On your development machine
git tag test-release
git push origin test-release
# Let the action run
git push origin :test-release  # Delete the tag
This lets you verify the output looks right before shipping it to production.
Taking time to verify your configuration on test tags prevents embarrassing mistakes in real releases. It's ten minutes of testing versus hours of trying to fix a malformed release announcement.
Troubleshooting: When Things Don't Work
Even with everything set up correctly, you might encounter issues. Here's how to diagnose and fix the most common ones.
Problem: Action Runs But Generates Empty Notes
This happens when the action runs but finds no changes between tags.
First, check if tags exist:
git tag -l
If you only have one tag, that's your problem. You need at least two tags for the action to generate a comparison.
If tags exist, verify the action found them:
Look at the workflow run logs. The action prints which tags it's using. If it's using the wrong tags, specify them explicitly:
from_tag: v1.0.0
to_tag: v1.0.1
If tags are correct but still empty, check if PRs are merged:
PRs must be merged between the two tags. If you only have direct commits, switch to COMMIT or HYBRID mode:
mode: HYBRID
Problem: PRs Not Appearing in Release Notes
This is usually a labeling issue.
Check if the PR has labels:
Look at the actual PR on GitHub. Does it have any labels assigned? If not, that's the problem. Add labels and try again.
Check if labels match your config:
Look at your release-config.json. Does it have the label that's on the PR? Label names are case-sensitive. A PR labeled Feature won't match feature.
Try PR Mode specifically to debug:
mode: PR
This isolates the problem to PRs only. If PRs work in PR mode but not HYBRID, the issue is with commit parsing.
Problem: Workflow File Not Triggering
The workflow sits there without running when you push a tag.
Check the trigger pattern:
on:
  push:
    tags:
      - "v*"
Does your tag match this pattern? v1.0.0 matches. So does v2-beta. But version-1.0.0 doesn't. Make sure your tag follows the pattern.
Verify the file is on the main branch:
If you created the workflow file on a feature branch and merged it in a PR, it won't trigger for tags pushed before that PR was merged. Commit the workflow to main first, then push tags.
Problem: Config File Not Found
The action runs but says it can't find your config file.
The path in config_file is relative to the repository root, not relative to the workflow file. .github/release-config.json is correct. release-config.json is wrong if the file is in the .github/ folder.
Double-check the path exists:
ls -la .github/release-config.json
If it doesn't exist, create it. Make sure the JSON is valid too:
jq . .github/release-config.json
If jq complains, you have invalid JSON. Common issues: trailing commas, unquoted strings, or missing colons.
Advanced Scenarios
Once you've got the basics working, you might want to push things further.
Generating Notes Without Creating a Release
Maybe you want to generate notes but not automatically create a release. You can output the notes and use them however you want:
- name: Generate Release Notes
  id: notes
  uses: nayandas69/smart-release-notes-action@v1
  with:
    token: ${{ secrets.GITHUB_TOKEN }}

- name: Save Notes to File
  run: echo "${{ steps.notes.outputs.changelog }}" > RELEASE_NOTES.md

- name: Commit Release Notes
  run: |
    git config user.name "github-actions[bot]"
    git config user.email "github-actions[bot]@users.noreply.github.com"
    git add RELEASE_NOTES.md
    git commit -m "docs: add release notes for ${{ steps.notes.outputs.to_tag }}"
    git push
Now your release notes are stored in version control too.
Conditional Release Notes Based on Version Type
Want different formatting for major vs minor vs patch releases? You can detect the version and adjust:
- name: Generate Release Notes
  id: notes
  uses: nayandas69/smart-release-notes-action@v1
  with:
    token: ${{ secrets.GITHUB_TOKEN }}
    config_file: .github/release-config.json

- name: Determine Release Type
  id: version
  run: |
    TAG="${{ steps.notes.outputs.to_tag }}"
    if [[ $TAG == *".0.0" ]]; then
      echo "type=major" >> $GITHUB_OUTPUT
    elif [[ $TAG == *".0" ]]; then
      echo "type=minor" >> $GITHUB_OUTPUT
    else
      echo "type=patch" >> $GITHUB_OUTPUT
    fi

- name: Create Release (Major)
  if: steps.version.outputs.type == 'major'
  uses: softprops/action-gh-release@v2
  with:
    body: "🚀 **Major Release** 🚀\n\n${{ steps.notes.outputs.changelog }}"
This gives you more control over how different release types are presented.
Why This Matters to Your Team
I've watched teams implement Smart Release Notes Action and the impact goes beyond just saving time. Release notes become part of your team's communication strategy with users. Good release notes make users feel informed and cared for. They build trust.
When your release notes are automatically generated from properly labeled PRs, you ensure consistency. You prevent the situation where some PRs get forgotten or buried because they didn't make it into the manual draft. You eliminate the "wait, what did we ship?" uncertainty that happens when releases are chaotic.
Plus, there's the time factor. Generating release notes shouldn't take three hours of your week. That time is better spent building features or fixing bugs.
Getting Help When You Need It
If something goes wrong despite following this guide, here's where to get help:
- GitHub Issues: Check the Smart Release Notes Action repository for open issues
- Workflow Logs: Your Actions tab shows detailed logs of what went wrong
- Debug Mode: The action prints what it's doing; read the logs carefully
- Test Tags: Create test tags to experiment without affecting real releases
Wrapping Up
Smart Release Notes Action transforms release management from a tedious manual process into a seamless automated workflow. You define categories once, label your PRs consistently, and let the tool handle the rest.
Start simple – get the basic workflow running with default settings. Once that's working, layer in custom categories. Gradually add integrations like Slack notifications. Build it piece by piece, and before you know it, you have a release process that runs itself.
The best part? Your future self will thank you every time a new release goes out and the notes are already perfect, waiting in your GitHub Release page. No weekend work. No manual assembly. Just clean, professional release notes, automatically.
Give it a try on your next release tag. I think you'll be surprised how much smoother everything becomes.
More Posts
Building My Developer Portfolio wit...
How I built my personal developer portfolio from scratch using Nuxt 4, Vue 3, SCSS design tokens, the GitHub REST API, and the Blogverse API — with full SSR, unit testing, and Vercel deployment.

Git and GitHub: From Confusion to M...
Master Git and GitHub from first principles. Learn version control, collaboration workflows, and real-world practices that professional developers actually use every day.

Building a Dynamic GitHub Profile C...
Learn how to build a real-time GitHub profile card generator using Node.js, GraphQL, and SVG rendering. Explore caching strategies, API optimization, and deployment techniques.